
A Variable Star Light Board
In 1997, Bob Gent (a new variable star observer that I'd mentored) asked me to give a talk about observing variables at the upcoming Astronomical League's Starry Nights Festival. Using an overhead projector, I could run through a simulated estimate using a photograph, but the pitfall is obvious: star brightness is shown as circles of different sizes. The solution is equally obvious: your best chance at simulating the look of stars is to actually use small light bulbs to produce pinpoints of light. This idea was not new to me. Looking at my Christmas tree every year, I would see them as "stars" and think you might be able to use them to demonstrate variable star observing.
Early experiments proved that using Christmas tree lights (though cheap) was impractical. First, it was difficult to make the lights different brightness. Second, the appearance (brightness) could vary throughout a room because the bulbs were not spheres. There was a solution, but I did not know immediately if it was practical. As a youngster, I owned a Spitz home planetarium. The bulb used as its projector was a round flashlight bulb and it was controlled by a rheostat thereby allowing brightness control. All I'd need is a set of these types of lights, all individually controlled by their own rheostat. The main parts are shown in the close-up photo below: (For all the pictures, click on the image for a larger view.)
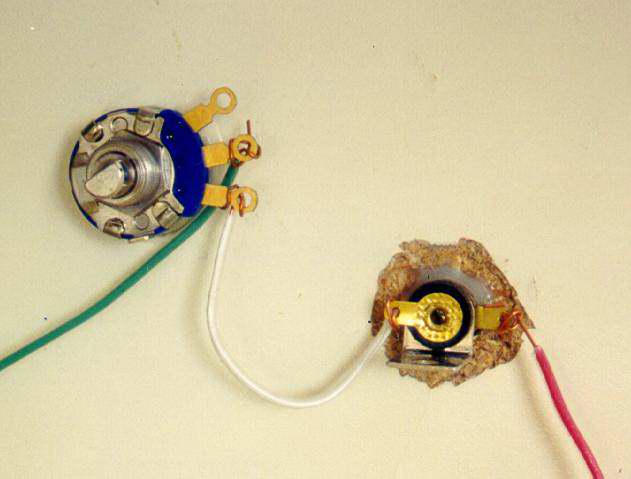 A) 14.4 volt bulb with screw in socket.
B) Screw in socket light bulb holder.
C) 1K Potentiometer.
D) 22 and 18 gauge wire.
E) Power source -- toy train transformer, 18 volts.
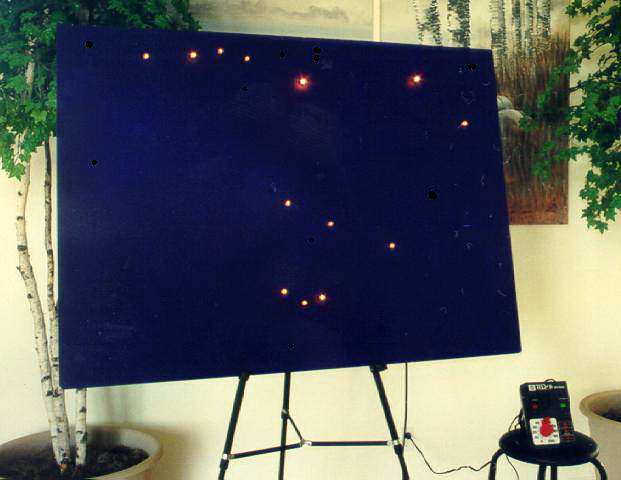
The ability to easily adjust a light meant that I could demonstrate a variable star at varying levels. But it also allowed another benefit: the ability to simulate a real star field. For several reasons, I chose the field of SS Cyg. Most of the comparison stars of this field are very close to the variable (which meant I could spread out the "stars" easier on the board. It is one of the most observed variables in the sky. And, from northern latitudes, it is observable year round.
 Click
on the image for a larger and clearer view.
Click
on the image for a larger and clearer view.
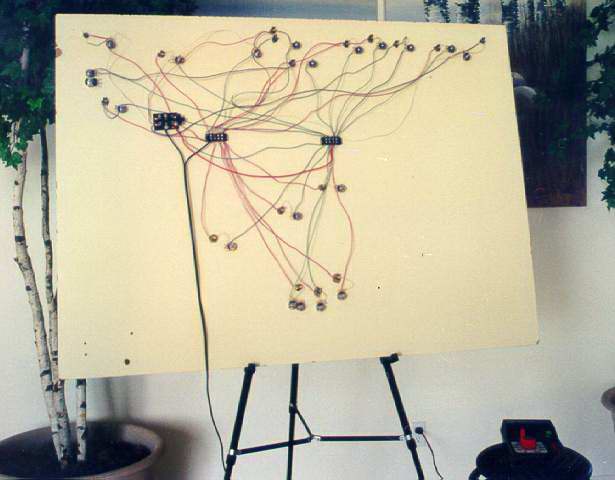
The size of the board was a major consideration. You want it to be as large as possible, but it must be transportable. I chose a size of 3 by 4 feet since this would fit in my car. To build it in several attachable/detachable pieces was out of the question since this project was already taxing my ability (I'm known as the Unhandyman). Standard paneling with 1/4 inch thickness turned out to match the light bulb sockets well.
All of the electronic parts needed for this project were available at Radio Shack, but no one store had enough stock on hand to fulfill the requirements. (These days Id suggest buying from the internet as getting odd electrical items like these because Radio Shack is now a distant memory.) The SS Cyg field required 13 "stars" and you couldn't seem to get more than eight of anything at one place. One big problem item was the potentiometer. Here, I resorted to an electronics surplus store which had hundreds in open boxes. At $.75 each, I felt this was a steal. The lowest ohm rating I could get in such bulk was 1K which turned out to work fairly well.
Powering the board seemed trivial. I had a spare train transformer: an 18 volt source. Having a rheostat control allowed the entire board to be brightened and dimmed at once. It was my hope that I could demonstrate that variable star estimates are a bit easier when the "stars" aren't so bright. At first I tried combinations of 2.47, 7.5, and 14.4 volt bulbs. The lower the voltage, the brighter the resulting light. But when you changed the overall level, the relative brightness changed dramatically. The solution was to use bulbs of one voltage and the 14 volt bulbs were by far the easiest to control. But there was unexpected trouble. My train transformer only produced 7 watts and with each 14.4 volt bulb rated at 100mA it was easy to overload it. The transformer would reset itself after about five minutes, but this was not acceptable for use in a public demonstration. I decided to buy a 45 watt unit which according to my calculations would be impossible to overload.

There was one last requirement for the light board. I wanted the initial demonstration of interpolation to be very simple. For this, I went for a simple three star configuration at the very top of the board. The "variable" would be at the top center with the comparison stars at either end of the board. But I didn't want this to interfere with the SS Cyg field, so it would have to have either an independent power source, or be switched. I opted for a knife switch.
The potentiometers are attached to the board by simple Elmer's glue.
Time has shown that this has worked, though I was skeptical at first.
It's apparently important to use enough glue and then give it a day to set.
For the light sockets, I drilled holes the size of the socket and then glued
them in place. I did not end up soldering the wire connections because
looping them was adequate. The last task was to paint the board a dark blue.
How It's Worked
 At a public demonstration, you are practically guaranteed
that the entire audience is new to VSOing. Nonetheless, I have had
what I consider to be very good results. I hand out "estimate
cards" where the audience members make a simulated estimate.
I first do it the easy way with only the top three lights on. Before
the demonstration, set the middle star (the variable) at a preset level
between the other two. Though the range of estimates (as you can imagine)
vary widely among a group, the average has always been within one-tenth
of what I have set. (Mind you, one-tenth of what I thought
and I could be off. :)
At a public demonstration, you are practically guaranteed
that the entire audience is new to VSOing. Nonetheless, I have had
what I consider to be very good results. I hand out "estimate
cards" where the audience members make a simulated estimate.
I first do it the easy way with only the top three lights on. Before
the demonstration, set the middle star (the variable) at a preset level
between the other two. Though the range of estimates (as you can imagine)
vary widely among a group, the average has always been within one-tenth
of what I have set. (Mind you, one-tenth of what I thought
and I could be off. :)
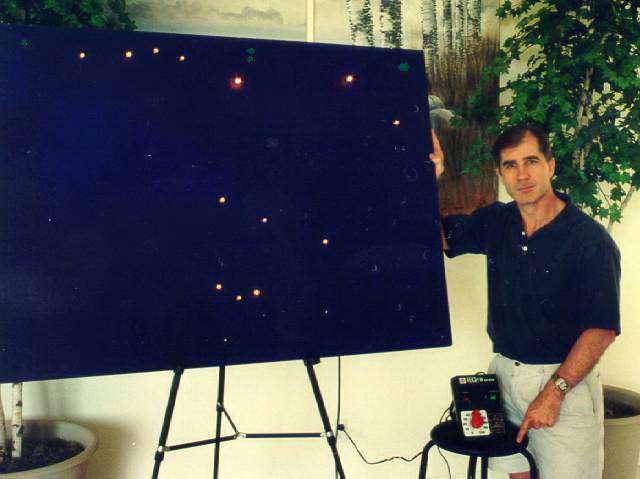
I have also let the group estimate SS Cyg on the board. Here, I give them no help at all. I point out SS Cyg on the light board, but they have to refer to the chart (I hand out a chart of this field and have it on an overhead projector-- see the image to the right) to pick appropriate comparison stars. Though the average wasn't all that bad, the scatter in the data was much wider. At least 5 percent of the audience were off by more than a magnitude.
The board itself has not given me any significant problems, despite the
abuse of travel. But I never taken any chances-- I carry a tool box
with plenty of spare parts should part of the board fail right before a
presentation.
What Can Be Demonstrated
1) Basic interpolation.
2) Finding suitable comp stars.
3) The dramatic difference of SS Cyg at quiescence and outburst.
4) Variable star estimates are easier when the stars are relatively dim.
5) The difficulty of estimating decidedly red stars. I have colored light that can be put in the SS Cyg position.
6) The difficulty of estimating when there is a star close to the variable.
7) Scatter in visual estimates.
8) Bias. Announce to the audience what you think the estimate is.